How to create your own Template?
Mapbender comes with application templates out of the box. But usually you want to use your own template with your own corporate design. This document will show you how to create a Workshop DemoBundle for demonstration purposes. The templates that come with Mapbender for demonstration purpose are located in the Template directory in the CoreBundle. To prevent overwriting your custom templates after an Mapbender upgrade you should create an extra bundle to safely store your custom files.
Since version 3.0.4.0 you can change the style of your application with the built-in CSS-Editor. You find the documentation about the CSS-editor at How to change the style of your application with the CSS-editor?.
How to create your own template?
Steps for including your templates:
- Create your own bundle
- Create a template PHP-file to register your template
- Create your own Twig-file
- Create your own CSS-file(s)
- Register your bundle in app/AppKernel.php
- Use your template
The new Application-template can be used in different ways:
- Entry in the YAML-file of the application (applications/app/config/applications/*.yml)
- Choosing the template when you create a new application in the backend.
- Change the template of existing applications by changing the
templatecolumn in the tablemb_core_application.
To use an own template we prepared a Workshop/DemoBundle, which can be used not only for application templates but also for customzing the administration interface. For the following steps, please download the files with the following links:
- from version 3.0.6 and newer: https://github.com/mapbender/mapbender-workshop/tree/3.0.6
- before version 3.0.6: https://github.com/mapbender/mapbender-workshop/tree/master
Create your own bundle
User bundles are stored in the src-directory.
This is how the structure can look like:
src/Workshop/DemoBundle/
                   WorkshopDemoBundle.php
                   /Resources
                                 /public
                                        demo_fullscreen.css
                                 /image
                                            workshop.ico
                                            workshop_logo.png
                                            print.png
                                            ...
                                 /views
                                       /Template
                                            fullscreen_demo.html.twig
                       /Template
                               DemoFullscreen.php
The following files have to be altered for design changes:
- twig - changes the structure (e.g. - delete a component like the sidebar)
- demo_fullscreen.css - change colors, icons, fonts
Create a new namespace
The file WorkshopDemoBundle.php creates the namespace for the bundle and refers to the template and to your css-files.
<?php
namespace Workshop\DemoBundle;
use Mapbender\CoreBundle\Component\MapbenderBundle;
class WorkshopDemoBundle extends MapbenderBundle
{
    public function getTemplates()
    {
        return array('Workshop\DemoBundle\Template\DemoFullscreen');
    }
    public function getElements()
    {
        return array(
        );
    }
}
?>
Create your own template file
In our example the template file is called FullscreenDemo.php. You find it at src/Workshop/DemoBundle/Template/FullscreenDemo.php.
In the template file you define the name of your template, the regions that you want to provide and refer to a twig file.
<?php

namespace Workshop\DemoBundle;

use Mapbender\CoreBundle\Component\MapbenderBundle;

class DemoFullscreen extends MapbenderBundle
{
   ...
}

public static function getTitle()
{
  return 'DemoFullscreen';
}
....

public static function listAssets()
{
       $assets = array(
           'css' => array('@MapbenderCoreBundle/Resources/public/sass/template/fullscreen.scss','@WorkshopDemoBundle/Resources/public/demo_fullscreen.css'),
           'js'    => array(
               '/components/underscore/underscore-min.js',
           ...
           ),
           'trans' => array()
       );
   return $assets;
}

...
->render('WorkshopDemoBundle:Template:demo_fullscreen.html.twig',...
Adding properties for your “sidepane” region
For a “sidepane” region are “tabs” and “accordion” properties supported.
- “tabs” orders Mapbender elements in tabs
- “accordion” displays Mapbender elements as an accordion list
For adding you define the function “getRegionsProperties” in the template file.
For configuration you check an option in your application’s configuration.
/**
  @inheritdoc
 */
public static function getRegionsProperties()
{
    return array(
        'sidepane' => array(
            'tabs' => array(
                'name' => 'tabs',
                'label' => 'mb.manager.template.region.tabs.label'),
            'accordion' => array(
                'name' => 'accordion',
                'label' => 'mb.manager.template.region.accordion.label')
        )
    );
}
Create your own twig-file
You find the twig-files at the following path:
- mapbender\src\Workshop\DemoBundle\Resources\views\Template
The easiest way to create your own twig file is to copy an existing twig, save it under a new name and change the content like colors.
cd mapbender/src/Workshop/DemoBundle/Resources/views/Template
Use the existing template from mapbender/src/Mapbender/CoreBundle/Resources/views/Template/fullscreen.html.twig and copy it to fullscreen_demo.html.twig
Create your own css-file
Create an empty css-file and fill it with content. You only have to define the parts that have to look different from the default style of the element.
Firebug can help you to find out the styles you want to change.
Your file could be named like this: src/Workshop/DemoBundle/Resources/public/demo_fullscreen.css and have the following definition:
.toolBar {
  background-color: rgba(0, 29, 122, 0.8) !important;
}

.toolPane {
  background-color: rgba(0, 29, 122, 0.8) !important;
}

.sidePane {
  overflow: visible;
  background-image: url("");
  background-color: #eff7e9;
}

.sidePane.opened {
    width: 350px;
}

.logoContainer {
  background-color: white !important;
  background-image: url("") !important;
  -webkit-box-shadow: 0px 0px 3px #0028AD !important;
  -moz-box-shadow: 0px 0px 3px #0028AD !important;
  box-shadow: 0px 0px 3px #0028AD !important;
}

.sidePaneTabItem {
   background-color: #0028AD;
}

.layer-opacity-handle {
    background-color: #0028AD;
}

.mb-element-overview .toggleOverview {
    background-color: #0028AD;
}

.button, .tabContainerAlt .tab {
    background-color: #0028AD;
}

.iconPrint:before {
  /*content: "\f02f"; }*/
  content:url("image/print.png");
}

.popup {
  background-color: #eff7e9;
  background-image: url("");
}

.pan{
  background-color: rgba(0, 93, 83, 0.9);
}
The result of these few lines of css will look like this:
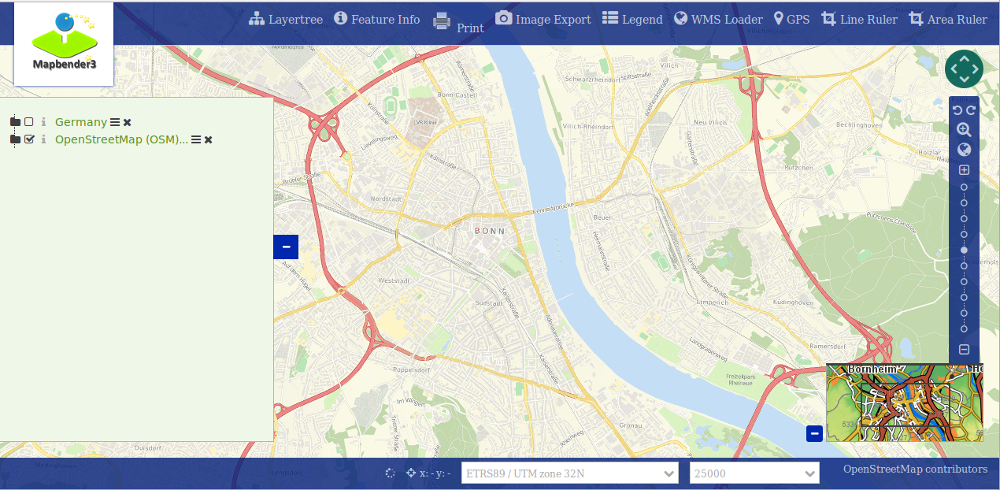
When you open your new application a css-file will be created at:
- web/assets/WorkshopDemoBundle__demo_fullscreen__css.css
If you do further edits at your css file you may have to delete the generated css file in the assets directory to see the changes. You should also clear the browser cache.
sudo rm -f web/assets/WorkshopDemoBundle__demo_fullscreen__css.css
Style the administrational pages
Please change the following css-files for the backend pages:
- login.css : Change the design of the login page
- manager.css : Change the design of the administration pages (e.g. application overview)
- password.css : Change the design of the password pages (e.g. Reset Password - page)
You only have to define the parts that have to look different than the default page style.
Firebug can help you to find out the styles you want to change.
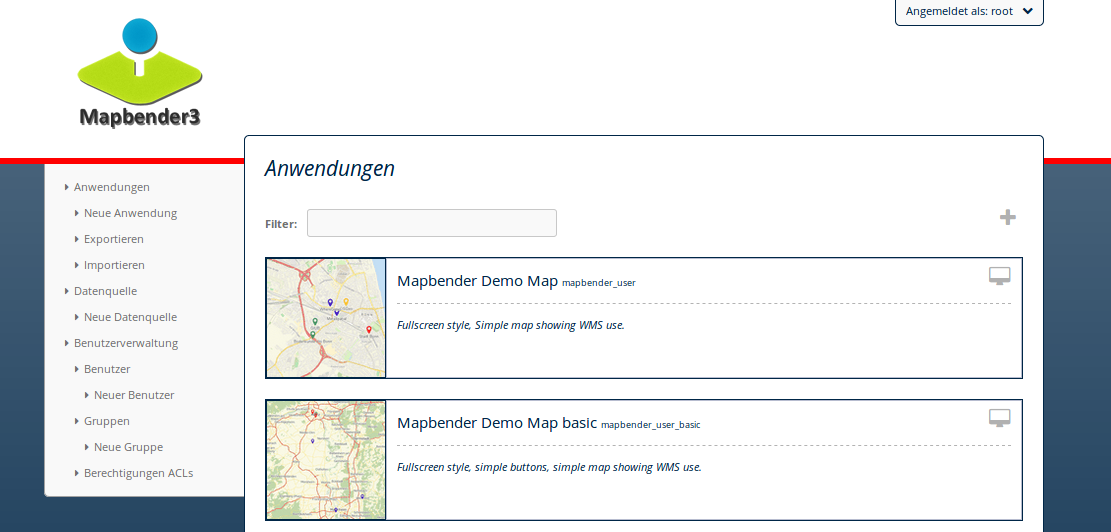
Referencing the CSS-files is possible with FOMManagerBundle and FOMUserBundle. They must be filed under app/Resources/. The already contained twig-files overwrite the default settings if configured correctly (Requirements from manager.html.twig file). Alternatively, it is possible to copy a twig-file and adjust it afterwards.
cp fom/src/FOM/ManagerBundle/Resources/views/manager.html.twig app/Resources/FOMManagerBundle/views/
When the unchanged stylesheet remain, administration looks as follows:
Register your template
To register your template you have to create a file at
- mapbender/src/Workshop/DemoBundle/Template/DemoFullscreen.php
cd mapbender/src/Mapbender/CoreBundle/Template
cp Fullscreen.php mapbender/src/Workshop/DemoBundle/Template/DemoFullscreen.php
Add your new css-file to the listAssets function as last array-entry:
public static function listAssets()
{
    $assets = array(
        'css' => array('@MapbenderCoreBundle/Resources/public/sass/template/fullscreen.scss','@WorkshopDemoBundle/Resources/public/demo_fullscreen.css'),
        'js'    => array(
            '/components/underscore/underscore-min.js',
            '@FOMCoreBundle/Resources/public/js/widgets/popup.js',
            '@FOMCoreBundle/Resources/public/js/frontend/sidepane.js',
            '@FOMCoreBundle/Resources/public/js/frontend/tabcontainer.js',
            '@MapbenderCoreBundle/Resources/public/regional/vendor/notify.0.3.2.min.js',
            "/components/datatables/media/js/jquery.dataTables.min.js",
            '/components/jquerydialogextendjs/jquerydialogextendjs-built.js',
            "/components/vis-ui.js/vis-ui.js-built.js"
        ),
        'trans' => array()
    );
    return $assets;
}
public function render($format = 'html', $html = true, $css = true, $js = true)
{
    $templating = $this->container->get('templating');
    return $templating
                    ->render('WorkshopDemoBundle:Template:demo_fullscreen.html.twig',
                             array(
                        'html' => $html,
                        'css' => $css,
                        'js' => $js,
                        'application' => $this->application));
}
Register your bundle in app/AppKernel.php
When you create a new application through the Mapbender administration you have to choose a template you want to use.
Before your new template will show up you have to register your bundle in the file app/AppKernel.php
- mapbender/app/AppKernel.php
class AppKernel extends Kernel
{
   public function registerBundles()
   {
       $bundles = array(
           // Standard Symfony2 bundles
           new Symfony\Bundle\FrameworkBundle\FrameworkBundle(),
           ....

           // Extra bundles required by Mapbender/OWSProxy3
           new FOS\JsRoutingBundle\FOSJsRoutingBundle(),

           // FoM bundles
           new FOM\CoreBundle\FOMCoreBundle(),
           ...

           // Mapbender bundles
           new Mapbender\CoreBundle\MapbenderCoreBundle(),
           ...

               new Workshop\DemoBundle\WorkshopDemoBundle(),

       );
Add write access to the web-directory for your webserver user.
chmod ug+w web
Update the web-directory. Each bundle has it’s own assets - CSS files, JavaScript files, images and more - but these need to be copied into the public web folder:
app/console assets:install web
Alternatively, as a developer, you might want to use the symlink switch on that command to symlink instead of copy. This will make editing assets inside the bundle directories way easier.
app/console assets:install web --symlink --relative
Now your template should show up in the template list when you create a new application.
Usage in YAML-applications
You can adjust the YAML-applications in app/config/applications and change the templtate parameter.
"template: Workshop\DemoBundle\Template\DemoFullscreen"
Usage in new applications
If you create a new application in the administration interface of Mapbender, you can choose the new template.
Usage in existing applications
For existing applications you can change the parameter in the Mapbender database in the column template of the table mb_core_application.
For the WorkshopDemoBundle you change the entry from Mapbender\CoreBundle\Template\Fullscreen to Workshop\DemoBundle\WorkshopDemoBundle.
Usecases
How do I change my design?
You have to edit the following files, if want to change the design
- twig - changes in the structure (like - delete a component like sidebar), refer to a logo
- demo_fullscreen.css - changes of color, icons, fonts
How do I change the logo?
The logo (default is the Mapbender logo) can be changed in the parameters.yml. Which causes a global change.
server_logo: bundles/workshopdemo/image/workshop_logo.png
Or in the twig file:
<img class="logo" height="40" alt="Workshop Logo" src="{{ asset('bundles/workshopdemo/imgage/workshop_logo.png')}}" />
How do I change the title and favicon?
You can adjust the title and the favicon also in the twig-file:
{% block title %}Workshop - {{ application.title }}{% endblock %}

{% block favicon %}{{ asset('bundles/workshopdemo/imgage/workshop.ico') }}{% endblock %}
How do I change the buttons?
Mapbender uses ‘Font Awesome Icons’ font icon collection:
@font-face {
  font-family: 'FontAwesome';
  src: url("../../bundles/fomcore/images/icons/fontawesome-webfont.eot?v=3.0.1");
  src: url("../../bundles/fomcore/images/icons/fontawesome-webfont.eot?#iefix&v=3.0.1") format("embedded-opentype"), url("../../bundles/fomcore/images/icons/fontawesome-webfont.woff?v=3.0.1") format("woff"), url("../../bundles/fomcore/images/icons/fontawesome-webfont.ttf?v=3.0.1") format("truetype");
  font-weight: normal;
  font-style: normal;
}
In your css-file you can refer to a font images like this:
.iconPrint:before {
  content: "\f02f";
}
If you want to use an image you could place the image in your bundle and refer to it like this
.iconPrint:before {
 content:url("imgage/print.png");
}
Try this out
- you can download the Workshop/DemoBundle at https://github.com/mapbender/mapbender-workshop
- change the color of your icons
- change the size of your icons
- change the color of the toolbar
- use an image instead of a font-icon for your button
- move the position of your overview to the left
- Have a look at the workshop files to see how it works